If you’ve ever cringed at the sound of your dog’s nails tapping across the floor or felt your stomach drop when they snag a claw on the carpet, you’re not alone. Many dog parents hold off dog nail trimming because it feels daunting, though. Learning how to trim dog nails safely at home makes the whole process way easier. Long nails can cause pain, alter posture, and even lead to long-term joint issues. Keep scrolling and know all about how you can cut your doggie nails safely at home.
- Why You Should Trim Your Doggie Nails
- How Often Should You Cut Dog Nails?
- Tools You’ll Need To Cut Your Dog Nails
- How To Cut Dog Nails In 7 Safe Steps
- Step 1 – Prepare Your Dog
- Step 2 – Hold the Paw Correctly
- Step 3 – Identify the Quick
- Step 4 – Make the Cut
- Step 5 – Use a Grinder If Needed
- Step 6 – Reward and Praise
- What If You Cut the Quick?
- Tips for Nervous or Resistant Dogs
- Desensitization Techniques
- Use of Positive Reinforcement
- Break It Into Short Sessions
- Consider Professional Help
- Common Mistakes to Avoid
- When to See a Professional Groomer or Vet
- Conclusion
Why You Should Trim Your Doggie Nails
Keeping your dog’s nails at a proper length benefits them in many ways. It goes beyond aesthetics and contributes to their comfort and health in key areas.
Prevents Pain and Injury
Overgrown nails are far more than an inconvenience. When your dog’s nails grow too long, they push back into the nail bed each time their paw touches the ground. This puts pressure on the surrounding tissue and leads to swelling and pain. Long nails also get caught on carpets, blankets, or uneven surfaces, which causes tears that can leave your dog limping or in distress. Regular trimming avoids these painful problems and ensures your dog’s paws remain injury-free.
Supports Healthy Posture and Movement
When nails grow too far, your dog’s natural posture starts to shift. Overgrown nails can force them to place extra weight on the back of their paws, which puts strain on joints and muscles. This improper distribution of weight takes a toll on their physical health over time and may lead to joint pain or stiffness in older dogs. By keeping their nails trimmed, you give them the freedom to move comfortably and maintain healthy alignment throughout their body.
Reduces Risk of Snags and Breakage
Active dogs love to dig sprint and explore. But long nails can hook on grass roots carpet threads or even their own bedding. A sudden jerk can tear the nail or worse injure the toe. If you keep their nails shorter, they’d be less likely to catch on anything. Plus, they’ll be less prone to splitting, which means fewer vet visits and more worry-free playtime.
How Often Should You Cut Dog Nails?

There’s no one-size-fits-all answer. The ideal schedule varies from dog to dog depending on their breed activity level and even the surfaces they walk on. A greyhound that runs on pavement might need trims less frequently than a lapdog that lounges on plush carpets. Here’s how to find your dog’s rhythm.
General Timeline
Most dogs need a trim every three to four weeks. This is a general guideline and may vary depending on their breed, activity level, and the type of surface they walk on. Dogs that frequently walk on hard or rough surfaces may require less frequent trims because the ground naturally wears down their nails. On the other hand, dogs that spend most of their time indoors likely need more regular trims. Paying attention to their nail growth ensures you avoid overgrown nails and the problems they cause.
Signs It’s Time for a Trim
Sometimes your dog’s behavior or appearance provides clear clues that their nails are too long. If you hear clicking sounds each time they walk across a hard floor, it is a sign that their nails are touching the ground too much. Nails that curve or visibly extend past the paw pads are also too long. Prolonged scratching or signs of discomfort when they walk may indicate they need a trim soon. These signs are your reminder to grab the nail clippers and help them maintain healthy nails.
Active vs. Indoor Dogs
Your dog’s lifestyle plays a big role in determining how often their nails need attention. Active dogs that enjoy outdoor adventures like running or hiking have their nails naturally shortened by contact with different terrains. They usually require less frequent trims. Indoor dogs, however, lack these outdoor surfaces to wear their nails down, so they often need trims more regularly. Observing your dog’s activity level can guide you in setting a trimming routine that suits their lifestyle.
Tools You’ll Need To Cut Your Dog Nails
- Nail clippers
- Styptic power
- Treats or Toys
- Towel
- Flashlight (For dark nails)
How To Cut Dog Nails In 7 Safe Steps
Step 1 – Prepare Your Dog
Before you start, it is important to create a comfortable space where your dog feels safe. Choose a quiet room away from distractions. Sit close to your dog so they feel at ease with your presence. Speak in a calm voice to reassure them. You can gently pet them and engage in an activity they enjoy for a few minutes. This reduces any tension and helps them relax. Having your tools ready within reach will also make the process smoother.
Step 2 – Hold the Paw Correctly
Once your dog seems calm, pick up their paw gently. Avoid being rough, as this can make them uneasy. Hold their paw securely but with care. Position your fingers so you can spread the toes slightly to expose the nails. A stable hold minimizes any movement and keeps your dog steady. This gives you better control and lowers the chances of any accidents while trimming.
Step 3 – Identify the Quick
Before cutting, take time to locate the quick inside the nail. The quick is the sensitive tissue that contains blood vessels. On dogs with light nails, the pink quick is usually visible, so cutting becomes easier. For dogs with dark nails, you may not see it as clearly. Trim only small portions at a time to avoid hitting the quick. If unsure, check the nail’s cross-section after each cut to make sure you stop short of this area.
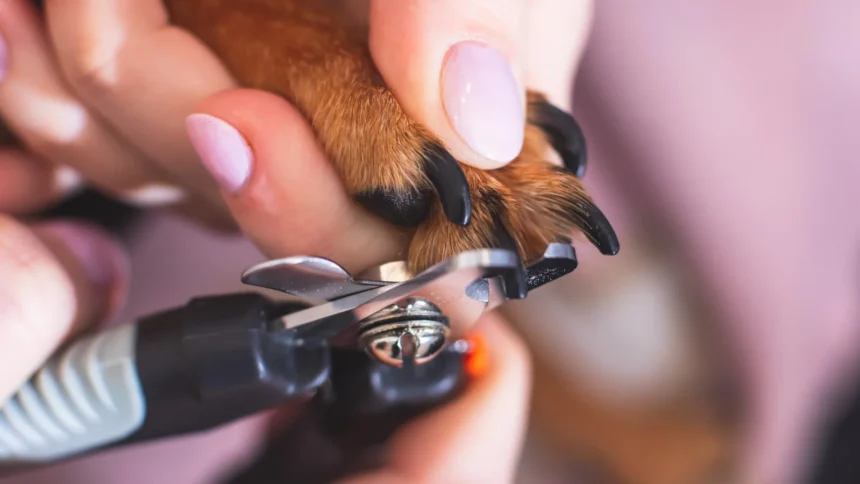
Step 4 – Make the Cut
Once you are ready, place the nail clipper around the first nail. Ensure it is positioned just below the quick. Hold the clipper firmly and make a clean cut in one motion. Avoid cutting too fast or hesitating while cutting, as this can make your dog nervous. Repeat the process for each nail, taking your time to trim carefully and evenly. Double-check each nail to ensure none are left too long.
Step 5 – Use a Grinder If Needed
After trimming, some nails may have sharp or uneven edges. Using a nail grinder is a great way to smooth these areas. Hold the grinder steady and gently rotate the tip over the nail’s surface. Move slowly and avoid staying in one spot too long. This ensures the process is comfortable for your dog while creating polished nails. If the grinder’s noise bothers your dog, take breaks as needed and soothe them with a reassuring tone.
Step 6 – Reward and Praise
When the session is over, make sure to praise your dog generously. Offering a treat or playing their favorite game reinforces positive behavior. Tell them they did a great job, even if it was a little challenging. Positive reinforcement builds trust and improves their willingness to cooperate for future sessions. Over time, this step helps make nail trimming an enjoyable experience for both you and your furry friend.
What If You Cut the Quick?
Accidentally cutting the quick is a common fear for many dog owners. If this happens, stay calm and reassure your dog immediately. You will notice bleeding at the nail tip, which can be alarming but is not life-threatening. Quickly apply styptic powder to the affected area. This powder helps to stop the bleeding rapidly. If you do not have styptic powder, you can use something like cornstarch as an alternative. Apply firm but gentle pressure with a clean tissue or cloth to ensure the bleeding stops completely. Comfort your dog during this time to help them feel secure. When the bleeding has stopped, give them extra praise and a treat so they connect nail trims with positive feelings.
Tips for Nervous or Resistant Dogs

Some dogs hate having their paws touched. That’s normal, and it doesn’t mean you’re failing as a dog parent. It just means you need a gentle approach to make nail trimming feel less intrusive. Here’s how to ease them into it.
Desensitization Techniques
Start by making your dog familiar with the process slowly. Instead of jumping straight into cutting their nails, handle their paws regularly during play or cuddle time to get them used to the sensation. Introduce the nail clippers in a non-intimidating way by letting them sniff or explore the tool. Gradually bring the clippers closer to their paws without using them initially. Practice lightly tapping the clipper against their nails a few times to ease them into the process. This gradual pace reduces fear and builds confidence.
Use of Positive Reinforcement
Rewarding your dog at every step works wonders for making the experience a good one. Offer small treats, words of encouragement, or belly rubs each time they allow you to handle their paws or show cooperation. This reinforces the idea that good things happen when they stay relaxed during nail trimming activities.
Break It Into Short Sessions
For especially nervous dogs, trying to cut all their nails in one sitting can feel overwhelming. It may help to break the task into smaller sessions. Trim just one or two nails at a time and spread the process over a couple of days. Gradually increase how many nails you trim in each session. This slower approach keeps the experience positive without overwhelming your dog.
Consider Professional Help
If your dog remains highly resistant despite your efforts, professional groomers or veterinarians can step in to help. They have the experience and techniques to handle nervous or uncooperative dogs safely. Observing a grooming session can also give you ideas and confidence to manage nail trimming at home in the future. This ensures your dog’s needs are met without creating unnecessary stress for either of you.
Common Mistakes to Avoid
- Cutting too much
- Using the wrong tools or tools that are dull
- Skipping regular trimming sessions
- A more frustrated and anxious approach can stress your puppy out
When to See a Professional Groomer or Vet
Sometimes, despite your efforts, trimming your dog’s nails at home might not feel manageable. Visiting a professional groomer or veterinarian is a good option in these situations. Professionals are trained to handle dogs of all temperaments, including those who resist grooming activities.
You should consider professional help if your dog’s nails are very overgrown. Extended nails sometimes require special tools or techniques to trim them safely. Groomers also know how to deal with nails that have thickened or have irregular growth patterns.
For dogs that become extremely nervous or aggressive during nail trims, professionals have the experience and equipment to manage them in a safe and controlled way
Conclusion
Trimming your dog’s nails not only keeps them comfortable but also protects their overall health. With the right tools, patience, and techniques, you can make this a routine part of their care. Pay attention to their activity level and nail growth to create a schedule that fits their needs. If the process feels overwhelming, do not hesitate to seek professional help. Regular nail care helps your dog move freely and stay healthy, making it worth the effort every time. By mastering this skill, you provide your furry companion with the care they deserve while strengthening the bond you share.


